However when we talk about an S curve. Youll be adding points and adjusting a curve to make tonal adjustments.

How To Use The Tone Curve In Lightroom Pretty Presets For Lightroom
But you dont always have light.

. To achieve that one perfect picture there are hours of editing involved. Learn all about the very powerful Curves adjustment. While using this technique may seem self-explanatory there are a few things to keep in mind for best effect.
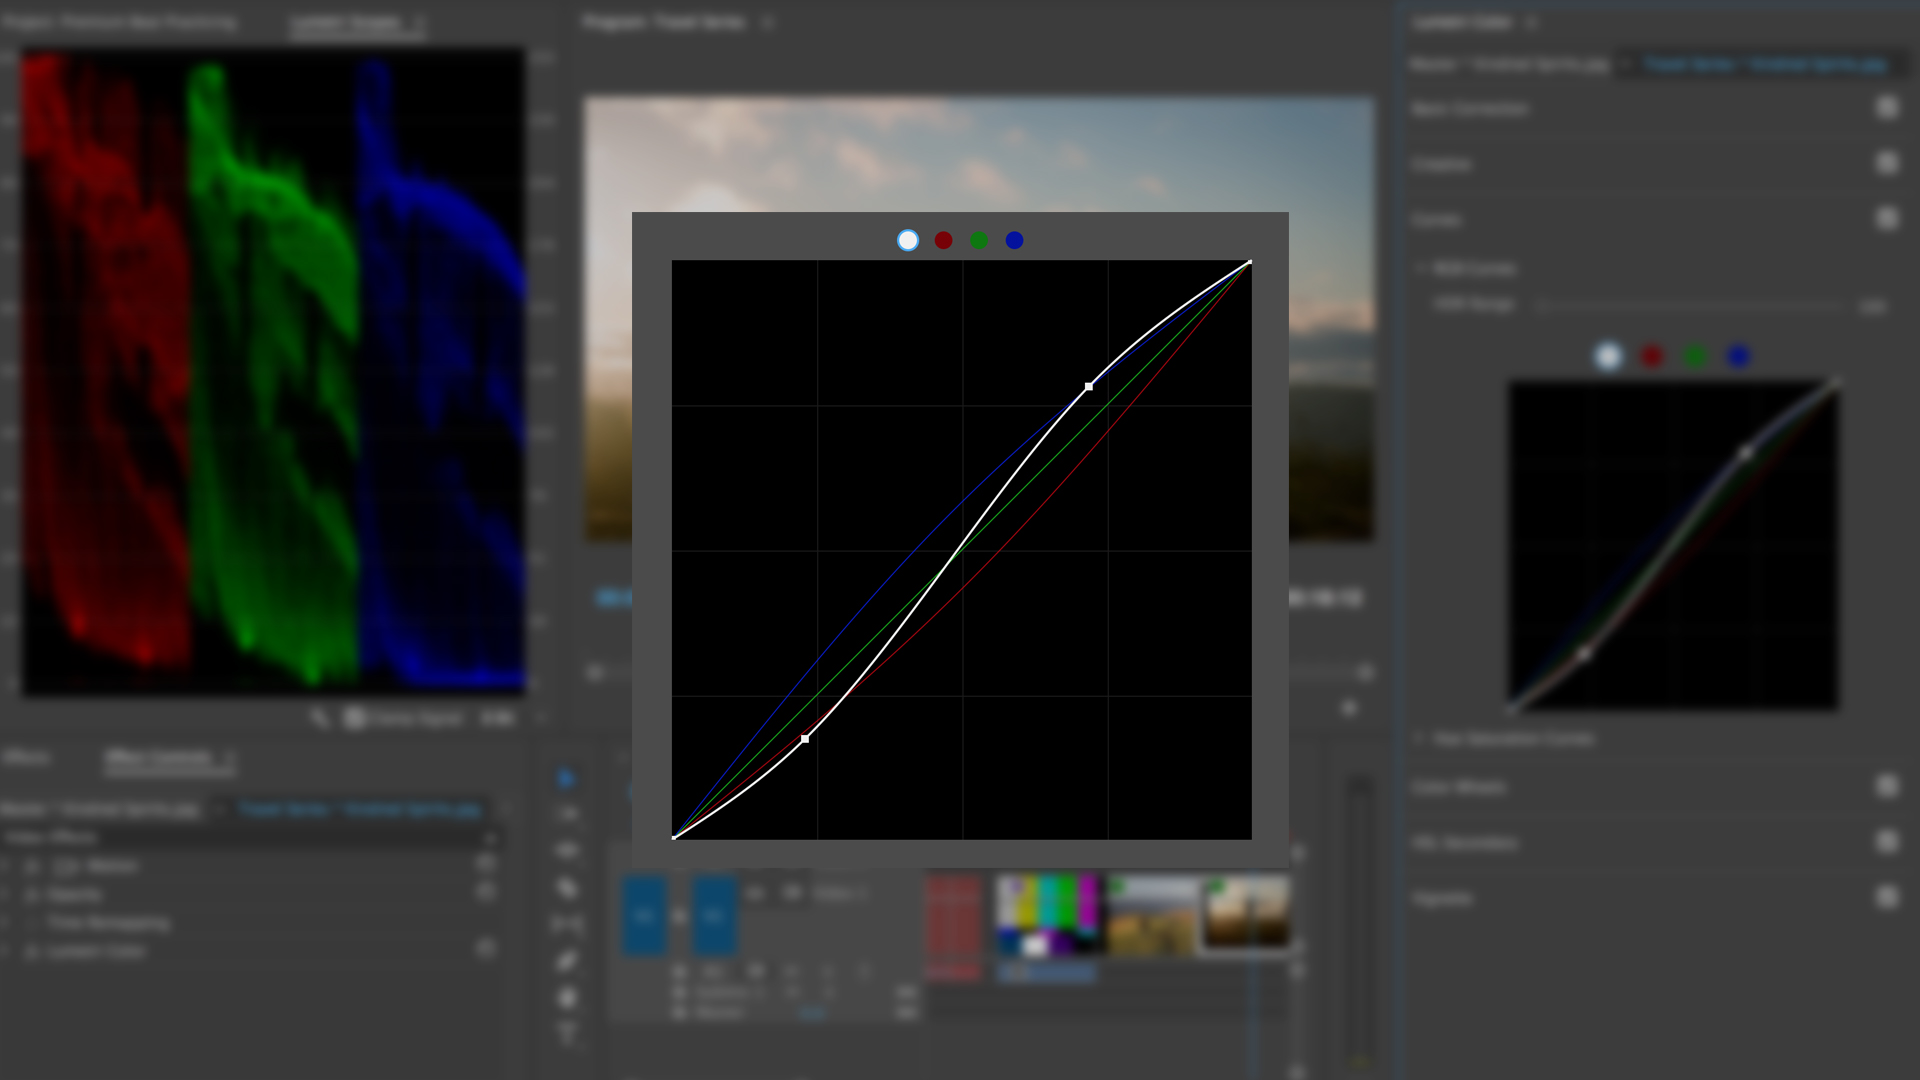
The tone curve is a tool in Lightroom used for adjusting tones to make images brighter or darker and to adjust colors. Remove unwanted objects from your photos like magic. Colors are adjusted using the separate red blue and green curves.
In general a conservative approach is what works best when editing product photography. The green circle on the map below is the location where the S Curve photo was taken. Download the greyscale image and the colorwheel below and play around on them using the curves tool.
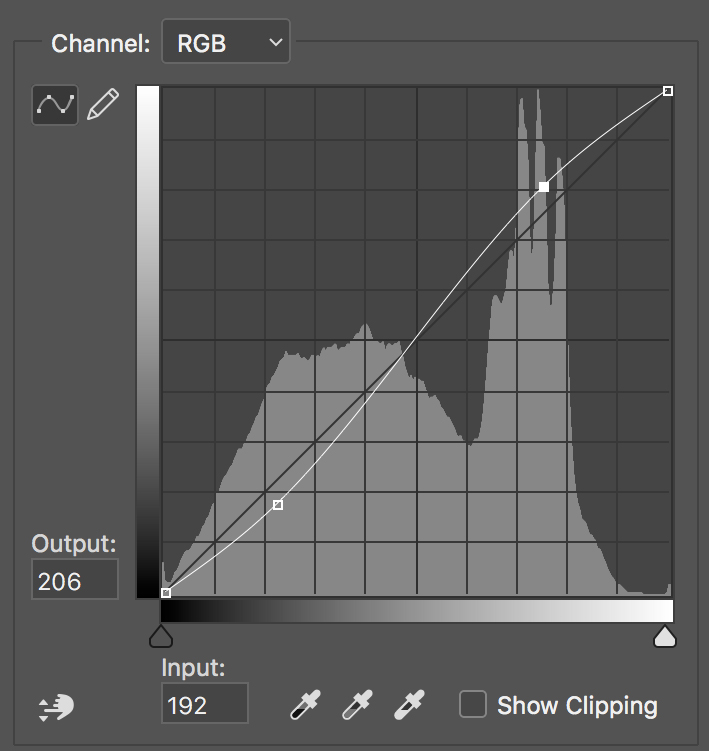
New users often find the Tone Curve challenging but its one of. Notice how the histogram spreads out but with minimal clipping. The S-curve is a composition technique that can be used in many different genres of photography though it is particularly useful for landscape photography.
Its easy to overdo the saturation. NIKON CORPORATION NIKON D850. It is a type of leading line which when used strategically can greatly enhance your overall composition.
Learning is a never ending process when it comes to photo editing. Both the RGB tone curve and the color tone curves are divided. The reason that it is called an S-curve is that this leading line takes on.
This technique using the Curves command in Photoshop is actually a powerful tool for tweaking the brightness contrast and colors of your photos. The S in S curve describes the shape of the curve or line in a photo. But the photos are usually RGB so youll see red green and blue.
Its that simple and therefore easy to see. What editing or post production work do I make on my macro images. Ad Enhance your photos with filters layers graphics text overlays.
However the bells and whistles for each program may vary. Try Canva Pro For Free. The S curve also seems to make the colors.
We are an online Photography Community with over 300000. Photo by Lachlan Gowen The S curve takes the viewer through a visual journey into the scene towards the subject and helps the viewer to explore the scene while passing through other important. Ad Edit Photos With Filters And Premium Editing Tools.
A quick way to add contrast to an image is to use the popular S curve. But it can be intimidating to some. I looked at the view from different floors but in the end I decided to take the photo from the 4th floor.
So when you dont have light the next best thing to look for is a lovely S-Curve leading into your image. A popular effect for photos is to reduce contrast with a matte effect. Lighting is an essential part of photography to understand.
Use tone curve instead of S-curves. You will now have the S Curve dialogue box on the work palette. If after adding that S curve I still see most of the information condensed somewhere in the histogram I will increase the contrast slider.
The Photoshop Curves tool is one of the most powerful commands you have in the digital darkroom. Tones from shadows to darks midtones lights and highlights are adjusted using the RGB curve. Your understanding of light will shape how you understand your histogram.
We are now at the nitty gritty part where all the fun happens. All types of photography use S curves for example. Lines are integral components of a composition.
Using Curves in Photoshop Elements. And one major tool for color correction is the Curves Tool. Their strategic inclusion can determine the success of an image.
We will cover all the basics of Curves using Curves to adjust color and white bal. What I would like to achieve is to highlight the lotus flower and darken the background so the flower really stands out like a shining beacon of beauty. S curve can be applied as a compositional tool to any genre of photography but is most commonly used when composing landscape and cityscape shots.
The S curve is the most sensual and graceful line one can incorporate into their images. A deep S curve. 3 Tips on Using the S-Curve in Your Photography.
If youre using Photoshop Elements you wont be able to create a Curves adjustment layer but there is a similar tool you can use. If you decide to use this slider nudge it up a tad to about 5 or 6. To access this tool select Enhance Adjust Color Adjust Color Curves.
This is substantiated by the fact that specific classifications of lines are. Then you can continue editing the curve to finish your look. In this astrophotography editing tutorial youre going to edit my photo of NGC 7000 The North America NebulaI chose this target as a tutorial piece as it has a lot of nebulosity to work with its a busy image to learn where to point your colour samplers theres a lot of stars to reduce but there arent any bright stars like Navi or Alnitak to make life even harder.
If youre using the S-curve as the primary focus of your photo make sure that the line isnt broken by other elements like branches or logs. Text Photography By Russ Burden. Although we also talk about creating an S curve when adjusting the tone curve in post processing and thats also in the shape of an S.
Here are 6 Photoshop Curves techniques every photographer. What is an S curve in Photoshop. I like to add a subtle S-curve after the matte effect to bring back contrast in my photos.
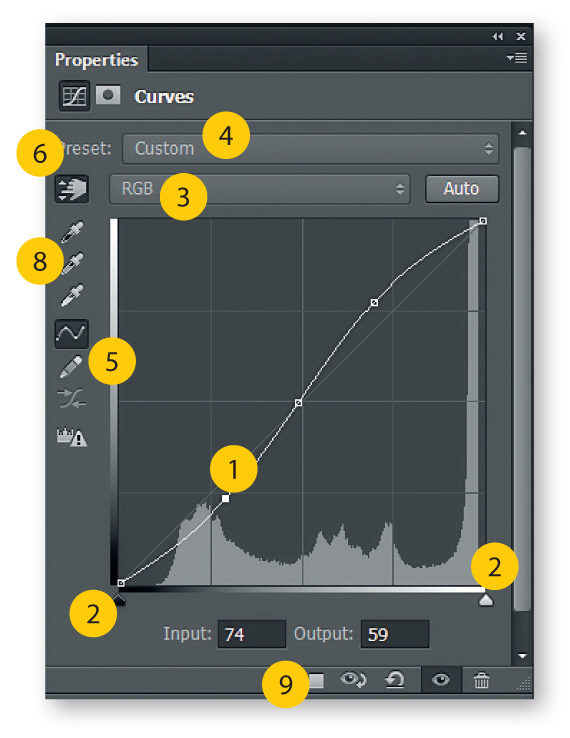
Made by dragging one point upwards in the highlights and a second down in the shadows and sometimes with a third to anchor the midtones the S-shaped curve is a classic tonal tweak for boosting contrast and colour saturation. Ad Replace your photo Background or Erase unwanted Objects with just few clicks. You can use the Tone Curve on individual channels to edit different tonal areas in the image.
A Landscape Photography Composition Technique. No matter the program youre using the basics of editing with curves are the same. Next I will turn once again to my histogram.
You can then click and drag the sliders to adjust the curve. Click to open in a new tab then right-click to save it. Updated March 8 2021.
If your photo is in CMYK you will see cyan magenta yellow and black channel. Then try it on some of your own images. Its a public parking lot that is free if you are traveling by foot.
One of the things that photographers first learn in photo editing is the using the S-curve. Now its your turn to give curves a try. A Canadian Pacific train drives around Morants Curve and the Bow river on its way to Banff from Louise Lake.
Is the true beauty of macro photographyTake the two images below for example the first shows the original photograph resized for display purposes while the second photograph is a cropped version showing the finest detail. Click to open the full sized image in a new tab then save it to your computer by right-clicking. Light is one of the most important elements in landscape photography.
When you click a picture you might need to enhance it in the post processing stage in terms of contrast balance and color correction. It may not be the easiest command to master for. Choose the channel you want to edit from the drop-down menu.
To create this using curves simply click the point on the lower-left part of the curve line and drag it upward. The more pronounced the S-shape the more the image will pop. Used by over 2 million brands designers and creators.
A Beginner S Guide To Color Curves For Powerful Correction

7 Tone Curve Tips That Will Make Your Editing Better Fstoppers
Understanding Curves Tool In Photo Editing Lightx App
Photoshop Curves Tool 6 Techniques Every Photographer Must Know Techradar

The Coffeeshop Blog Coffeeshop Editing 101 S Curve Pop Ps Pse Action And Unwrapped Tutorial
A Beginner S Guide To Color Curves For Powerful Correction

Coffeeshop Editing 101 S Curve Pop Ps Pse Action And Unwrapped Tutorial Pse Actions Photography Help Photo Fix

Confused By The Tone Curves This Is How They Work And How To Use Them Diy Photography
0 comments
Post a Comment